A Guide to NPM Overrides: Take Control of Your Dependencies
Master dependency management with npm overrides — fix vulnerabilities, resolve version conflicts, and take full control of your Node.js projects.
If you’ve ever opened a package-lock.json and wondered “how on earth did I end up with three different versions of lodash?”, you’re not alone.
Modern Node projects often depend on dozens, sometimes hundreds, of nested packages. These transitive dependencies can cause version conflicts, security vulnerabilities, or mismatched expectations between libraries.
Fortunately, npm introduced overrides as a powerful tool to help.
This guide explains what overrides are, when to use them, and how to apply them effectively with practical examples, common pitfalls, and debugging tips.
Historical Note:
Yarn introduced resolutions years earlier as a way to unify dependency trees.
npm followed with overrides in v8.3.0 (2021), giving developers a native way to enforce dependency versions without external tools.
TL;DR Example
{
  "overrides": {
    // Replace lodash everywhere
    "lodash": "4.17.21",

    // Replace webpack only inside react-scripts
    "react-scripts": {
      "webpack": "5.74.0"
    },

    // Replace eslint itself and its chalk dependency
    "eslint": {
      ".": "8.56.0",
      "chalk": "5.2.0"
    }
  }
}
One small section in package.json, one giant leap for dependency sanity.
Why Overrides Exist
Node projects often have two different kinds of dependencies:
- Direct dependencies — packages you list in dependencies or devDependencies.
- Transitive dependencies — packages that your dependencies depend on.
The trouble can start when those transitive packages use versions that are:
- insecure (e.g., have CVEs),
- conflicting between different packages, or
- no longer maintained.
You could fork and fix every affected dependency but that’s painful, especially for something three levels deep.
Instead, npm gives you a shortcut: declare an override right in your root package.json.
How Overrides Work
Overrides tell npm:
“If you need to install package X, use this version instead, no matter what its parent requests.”
Example
Let’s say your app depends on foo, and foo depends on bar@1.0.0.
{
  "dependencies": {
    "foo": "1.0.0"
  }
}
But you’ve found that bar@1.0.0 has a security flaw, and you want bar@1.0.1 everywhere.
You can fix it with:
{
  "overrides": {
    "bar": "1.0.1"
  }
}
Now, when you run npm install, npm forces all instances of bar to use version 1.0.1, even those pulled in by other libraries.
When to Use Overrides
.png)
Override Approaches
1. Simple “String” Override
This is the most common case.
{
  "overrides": {
    "lodash": "4.17.21"
  }
}
This replaces every lodash in your project tree with version 4.17.21. Think of this as a global substitution.
2. Targeted “Object” Override
Sometimes you don’t want to override everywhere — just inside a specific dependency.
Example:
{
  "overrides": {
    "react-scripts": {
      "webpack": "5.74.0"
    }
  }
}
This only affects the webpack that react-scripts uses, not others. Think of this as ‘scoped surgery’ inside one dependency.
3. The "." (dot) Match Override
The "." object key confuses many people.
It means “apply this override to the package itself.”
For example:
{
  "overrides": {
    "eslint": {
      ".": "8.56.0",
      "chalk": "5.2.0"
    }
  }
}
- eslint itself is replaced with 8.56.0. (“.” match)
- Inside eslint, the dependency chalk will be forced to 5.2.0. (targeted object override)
This pattern is helpful when a package depends on an older version of itself or when you want to control a package’s own dependencies precisely.
Real-World Example: Patching a Vulnerable Dependency
You have a project that uses Express 3.21.2, an EOL framework, but you’re getting CVE warnings about one of its subdependencies.
Instead of forking and patching everything yourself, you can override the vulnerable dependency with a patched one (for example, from a commercial support partner like HeroDevs NES ):
{
  "dependencies": {
    "express": "3.21.2"
  }
  "overrides": {
    "express": {
      ".": "npm:@neverendingsupport/express@3.21.4"
    },
  }
}
This tells npm to use the patched express version from a different source. It’s an elegant way to apply security fixes without touching every dependent project.
Debugging Overrides
Even with overrides, debugging dependency trees can get messy. Here are some useful tactics.
Check Installed Versions
See which versions are actually installed and where they came from:
NPM List <package-name>:
npm list body-parser

Shows the concise resolved tree structure — which versions of a package are installed and who depends on them.
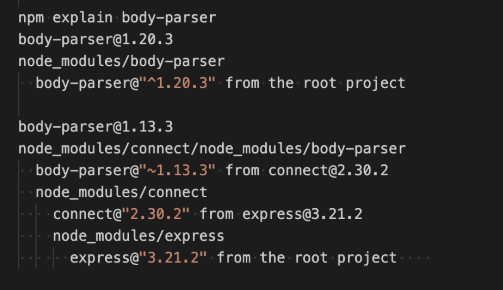
NPM Explain:
npm explain body-parser

This command shows the resolution path — which package requested it, which version constraints applied, and why that version was chosen. It is a reversed hierarchy compared to npm list.
Overrides and Lockfiles
Sometimes overrides don’t always get applied to existing lockfiles. Understanding when that happens can be helpful.
Situations where the lockfile is updated:
.png)
Remove Lockfile (last resort)
If your override isn’t taking effect, you can remove the package-lock.json:
Warning: Make sure to backup the the lockfile so that it can be restored. Many older or fragile legacy applications can break if the original lockfile is changed or removed.
Other Tools
When things get hairy, some third party tools can help:
- npmgraph.js.org — interactive dependency graph
- depcheck — detects unused dependencies
These tools can help identify which packages depend on outdated or unwanted versions.
Common Pitfalls (and How to Fix Them)
.png)
Conclusion
Overrides are a powerful tool to help you specify new dependency versions to alleviate version conflicts and security vulnerabilities.
In summary:
- Overrides let you control what gets installed — even for nested dependencies.
- Use string overrides for global substitutions.
- Use object overrides for targeted dependency tweaks.
- Use "." to override a package’s own version or internal dependencies.
Use overrides for surgical dependency fixes, not permanent maintenance.

.png)
.png)
.png)